| Problem | If | Possible cause | Because | Solutions | Resources |
| Cut wrong size | Changed blade recently | Wrong core thickness | Core thickness of blades with reinforcement makes the cuts on wrong size when turning the head | Cut a rectangle with 0.01 degree undercut inclination on all sides (or “Disk manual editing” to make the head always inside the rectangle), disable the probing, check rectangle size after cut, if the actual cut size is bigger than the planned size, add the difference in Pegasus Blade core thickness, else if smaller subtract the difference. After this is set properly and saved, cut a rectangle with 0.01 degree with overcut inclination (or use “Disk manual editing” to make the head always outside the rectangle), then change in Pegasus both core thickness and segment thickness of half the difference between actual size and planned size, if actual cut is bigger then subtract, if actual cut is smaller then add. | change-blade-parameters-pegasus |
| Crashed machine recently, Or replaced the motor | Wrong C dimension | If machine motor got hit or it was taken off it may have moved |
First do motor alignment as shown in the videos at the bottom of the page, then cut a rectangle with 0.01 degree inclination on all sides (yellow circles all in), check rectangle size after cut, in machine 5axis folder (cnc folder postgui.hal for 2020 < machine) find and open the postgui.hal file, inside the file find the line setp gantrykins.c xxx (not the line that start with a hashtag #) or setp bk2020.c xxx (for B5 only) or setp sawjet2kins.c xxx where xxx is the value of the parameter, if actual cut size is bigger than the planned size, add half the difference to the gantrykins.c parameter, else if smaller subtract half the difference, save file, the changes done will take effect only after a complete CNC controller reboot
|
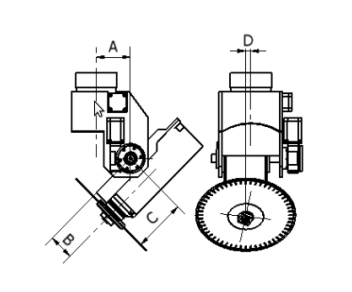 ABCD reference |
|
| Only miter cuts cut wrong size | Stone Probe sensor moved | check stone probe sensors are fixed well, the cylinder of the probe is going up and down good, and the plastic on the tip is well tight | First make sure that the issue is just with miters, cut a rectangle with 0.01 degree inclination on all sides, if there is difference, follow instructions above to change gantrykins.c . to adjust only miter cuts, cut a rectangle with 45 degree side inclination on all sides, then open in the 5axis folder (cnc folder cnc.ini for 2020 < machine) the subroutine folder and open parameters.ngc and change #<_zSlabProbe>=-xxx where xxx is the value to change, if miter actual cuts are bigger than planned size then subtract half the difference (mind that the number is negative -10-1=-11), if smaller then add half the difference (mind that the number is negative -10+1=-9) | ||
| Only one side cut wrong size | X or Y axis mechanically loose | Check X and Y axis mechanical play by shaking back and forth | Loosen screws that hold the gearbox and sit the gearbox tighter against the rack, check that the gearbox doesn't wobble, if it does take off gearbox pate and check gearbox screws on the inside, put Loctite, if gearbox slow shaft itself has play, replace the gearbox |
 |
|
| Finger bit and Blade not aligning | Changed homing sensors, new machine on install | Changing sensors can effect home position slightly, make sure home is proper, new machine install this is something to test and adjust | It is better to first adjust blade cutting properly, and make sure when you cut a rectangle with the head always in and also always out you can cut a good rectangle of correct dimensions (first point on this list), then set finger bit diameter a little bigger than real one to avoid it cutting over the blade, then if finger bit does not line up. For machine before 2023: open C:/Pegasus Data 3/Marble(Stone from V2021)/Machines/Aitalmac 5 Axis TCP/Orbit xx/Script.txt on line 11 the second line that starts with G10 L2 it's possible to move in X and Y the fingerbit on this line, by simply setting a value to X and Y, the finger bit will move in direction of the axis, if set X1 then fingerbit will move 1 to the right, if set X-1 then it will move 1 to the left. For machine after 2023: open //cnc/subroutine/parameters.ngc to move in X change the value of #<_secondTooloffsetX> and to move Y #<_secondTooloffsetY> the fingerbit will move in the axis direction of the amount you set, go negative to move opposite way. |
||
| Cut out of alignment | Changed C homing sensor | broken sensor | Changing sensors can effect home position slightly |
Look at videos to check the misalignment, of B and C axis, calculate correct adjustment angle to use with CAD according to the movement length and the gauge reading , or with the formula L tan(deg) which will give you the displacement for the deg angle at length L , alternatively just guess and adjust little by little. In the 5 axis folder find 5axis.ini file (cnc folder cnc.ini for 2020 < machine) find the [JOINT4] section and find HOME_OFFSET parameter, subtract the displacement in degree if you want move C+ and add it to move C-, restart the CNC completely, and home again to apply the changes, on machines with locked self homing, Connect to the CNC via VNC (CNC IP address should be 192.168.50.152), from the start menu in accessories open terminal or ctrl+alt+t as a shortcut, in the terminal windows write halcmd setp halio.pos.enable_save 1 and hit enter, then home again, wait 30 seconds and then type halcmd setp halio.pos.enable_save 0 in the terminal, and hit enter |
¶ Dial gauge checking videos
The cast iron square was used only because it's metallic and heavy, a C clamp, or an old blade will do just fine as well.
This first check to adjust you have to shift the motor itself
these other two you can use JOINT4 and JOINT3 HOME_OFFSET in the .ini file to adjust
for more details about adjustments see this page