¶ Starting the machine
Make sure the enable key is on and press the power on button, and turn on the computer from the I/O button on the right
side of the screen.
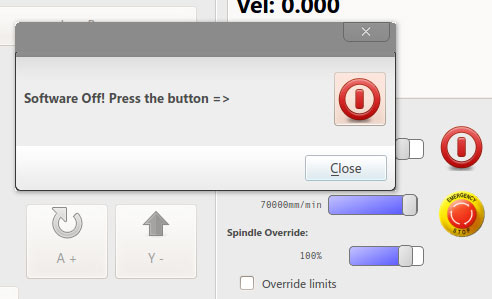
After the PC boots the EPR program will open and prompt you to press the software I/O button
After you turn on the software you should always home, after homing is done the axis position on the top right will be blue.
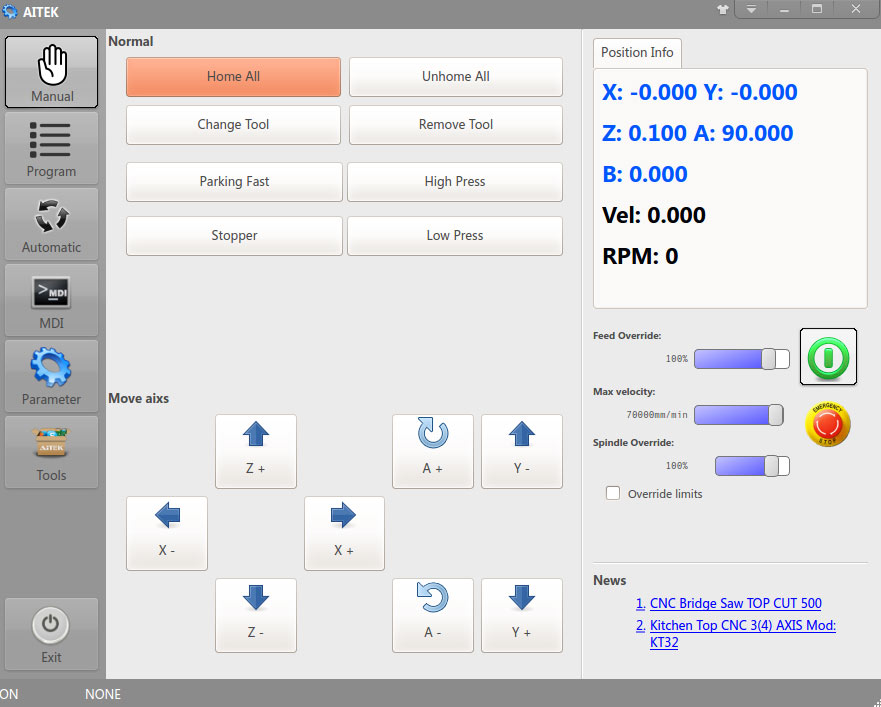
You can now start programming the machine, and run your programs
¶ Programming page overview
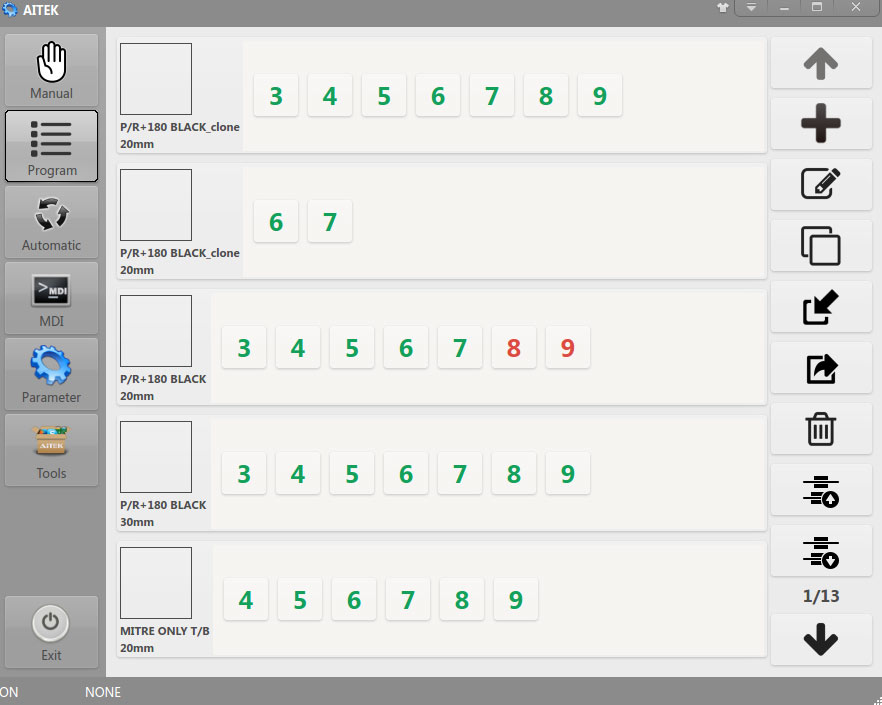
Click on the program icon on the left to access this page
in the middle you have a list of programs that were previously saved, on the right you will find the tool column with these
tools

up and down arrows to view the next page of programs, the current page is displayed on the right above the down arrow

Plus/Add button is used to create a new program

edit button to modify the contents of the selected program

Copy button to make a perfect copy of the selected program

Import a program that was previously exported in a file

Export button to export the selected program in a file

Delete button to permanently erase the selected program
these buttons help you to move the position of the selected program to arrange programs in different order
¶ New program
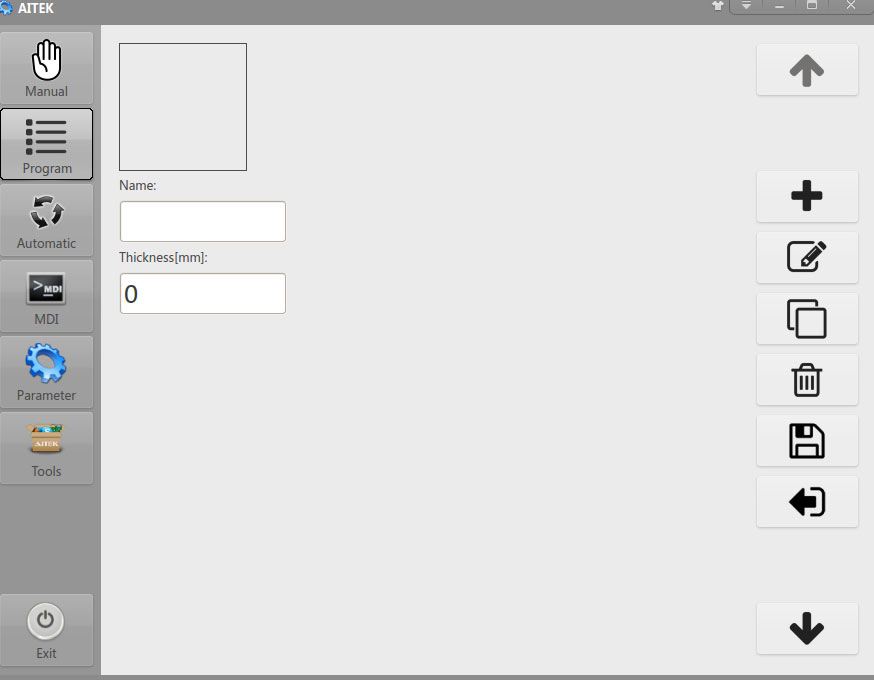
Set a name and thickness in the appropriate fields, note that the thickness does NOT effect the program, but is just there for
visual recognition of the programs from the main page.
You can click on the square above the name to add a picture, there are already available pictures for common shapes, but you
can add your own.
Looking to the right you will find similar tools like the program page, but these will take effect on the program sections instead
of the programs themselves

It's advised to save after setting up these initial parameters, use this save button on the right tool column to do so.
after saving you can use the add button to add a section of the program.
Edit button to modify the contents of the selected program section.
Copy button to make a perfect copy of the selected program section.
Delete button to permanently erase the selected program section.

Exit button to exit without saving, in case of mistake.
¶ Program section
Program sections are the sub branches of the programs, inside the program section you can specify a sequence of angles and
passes that the machine is going to execute, create a new section for when you need to orient the tool around a different
radius or center, when you need to work with another tool, change the RPM, the pressure or the speed.
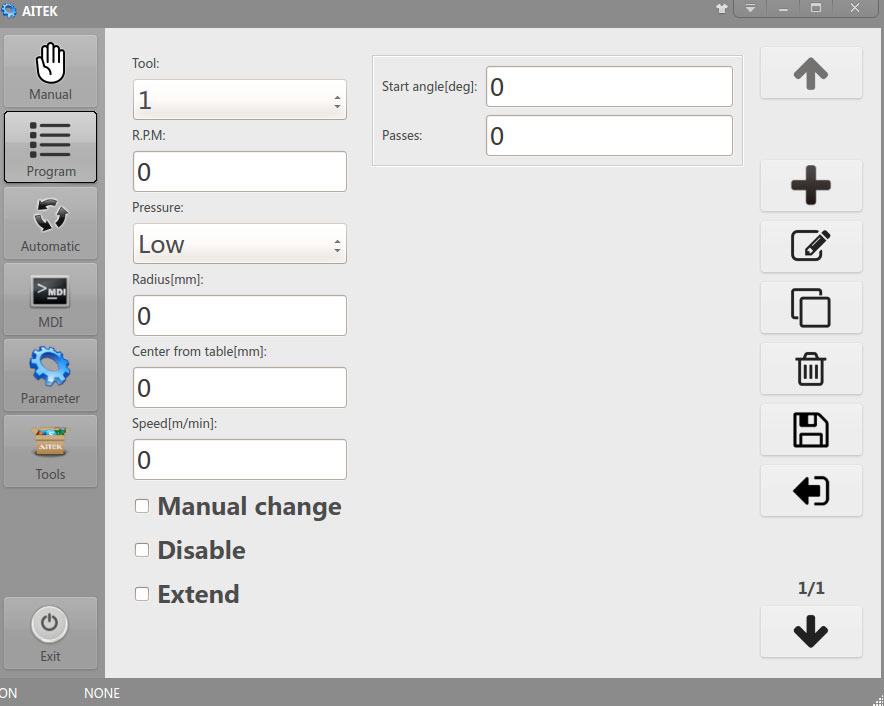
On the right column you will find the same buttons, but these will act upon the working blocks
up and down arrows to view the next page of working blocks, the current page is displayed on the right above the down
arrow.
Add button to add a working block.
Edit button to modify the contents of the selected working block.
Copy button to make a perfect copy of the selected working block.
Delete button to permanently erase the selected working block.
Save button to save changes to the working blocks.
Exit button to exit without saving, in case of mistake.
¶ Tool
The tool that the machine is going to pick up to execute the working blocks, it's important to note that it is NOT possible to go
back in the sequence of tools;
a sequence like 2‐3‐2‐1 is not possible, while 1‐2‐3‐4 is ok, 3‐4‐5 also ok, but 5‐4 is not.
It's ONLY allowed to write program sections progressively, it's NOT possible to insert sections in the program after you are
done programming it, to do so it's necessary to remake the whole program, and add the additional sections in the new
program as you write it from beginning to end, alternatively delete everything back to where you want to add a section, then
add the additional section and rewrite the deleted sections after it.
¶ RPM
Rotations per minute of the spindle these are typically 2500 for the diamond tools, and 1500 for the pads.
¶ Pressure
There are two choices Low and High, there are regulators on the side of the panel, it's recommend to keep pressures at
factory settings 0.2Kg/cm² low and 0.4Kg/cm² high.
The High pressure is mostly used when working with the diamond tool to shape the stone, diamond tool is very aggressive, so
only use to rough up those shapes where you need to grind a lot of stone to make them, like a bullnose; high pressure is also
used on flat face to push a bit harder with some tools, some tools require more pressure for a good finish, this depends on
tools and stone, normally low pressure is ok for polishing flat and corners with most common pads.
¶ Radius and center from table
The machine works around the radius, this means it will center the tools around the radius as if it was making a circle, no
matter what shape you are making your references are based on circles
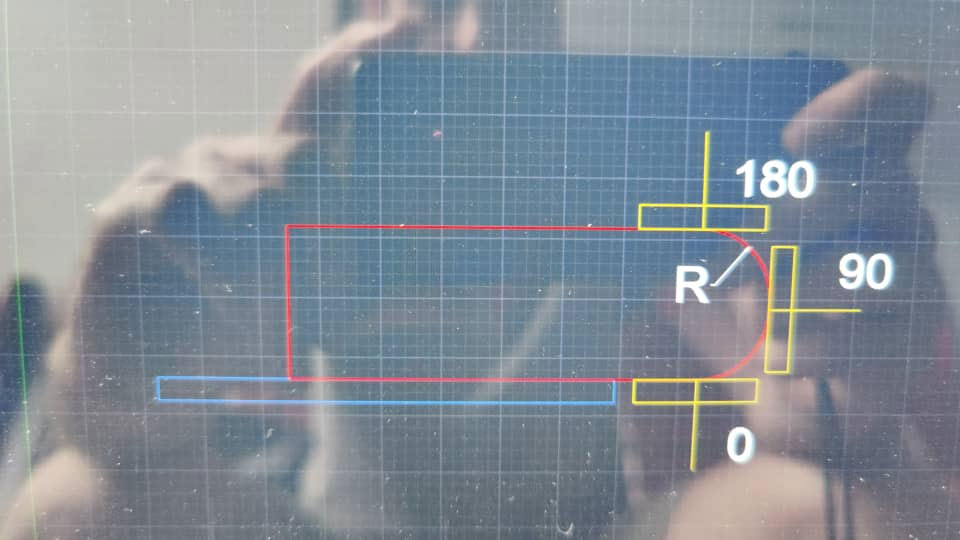
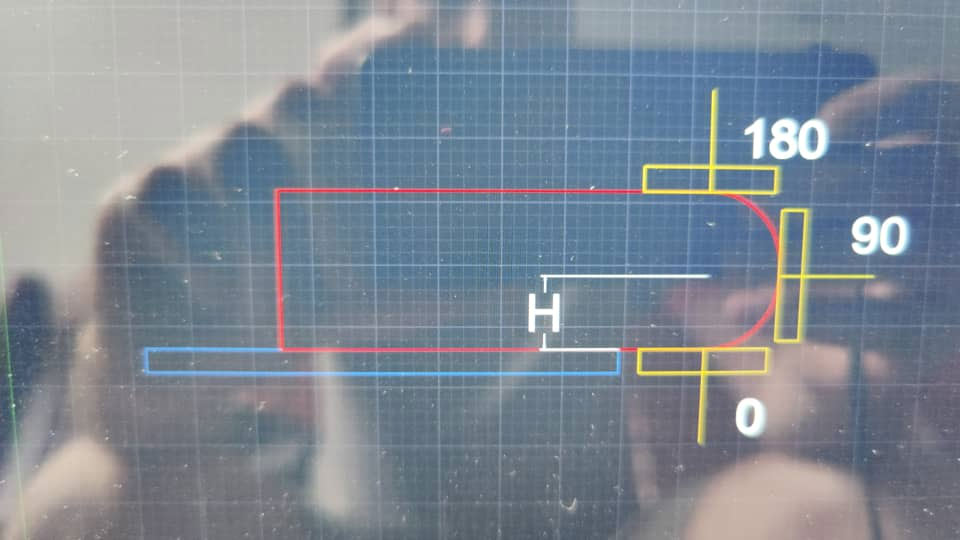
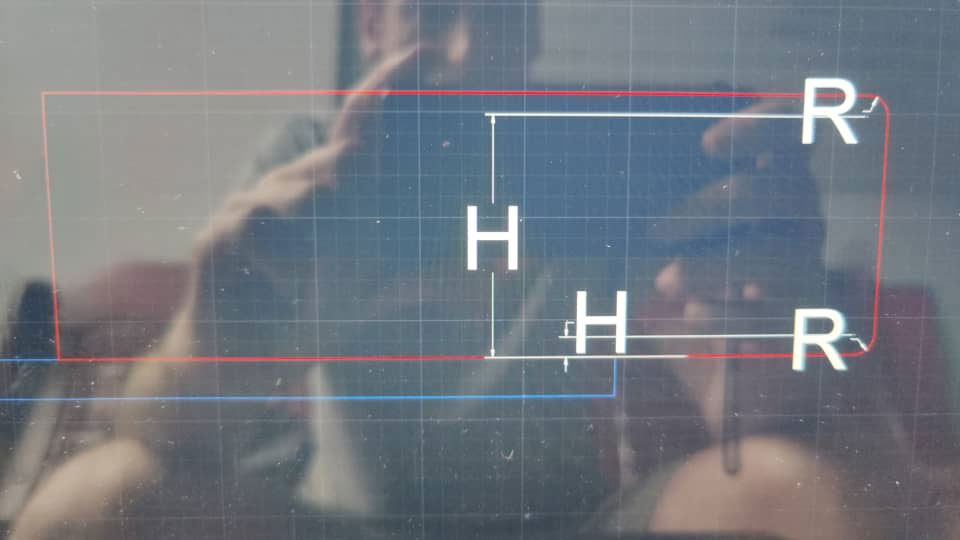
Observe the pictures above in detail.
The machine table is colored in BLUE.
The tool is YELLOW.
The resulting shape is in RED.
R is radius.
H is center from table.
When you want to do a shape with small radius on top and bottom like in the last picture, you have to divide it in at least
three sections per tool, which are bottom radius, vertical flat, and top radius, optionally also top flat.
Sections are commonly ordered from the bottom up, the stone needs to lay polish down on the table.
The bottom radius program section will be set to something like radius 3 and center from table 3, being that the bottom
radius is at table level, center from table and radius are the same.
For the flat program section, if you look at the pictures above you can see that when the tool is at 90°, the center of the tool is
directly in line with the center from table height, therefore center from table should be set about ¾ of the stone thickness,
half the stone thickness will work as well, but ¾ helps to better spread the cooling water, better cooling avoid shadows in the
polish. The radius on the flat section does NOT effect the machine position at 90° but it's commonly set at half the stone
thickness.
The top radius program section should then be set to radius 3 matching the bottom radius, but center from table should
instead be set to the result of the simple calculation (stone thickness ‐ radius), this is because the top radius is in line with the
top which is stone thickness from the table, but the center of the radius is under it of one radius length, therefore the radius
needs to be subtracted from the stone thickness to get the center from table for our top radius.
If you want to add another program section for the top surface, you can use same radius and center from table as the top
radius, or you can set the radius as ½ the thickness, and the same for the center from table to move the center of the tool
farther inside getting more cooling water on the stone.
¶ Speed
The working speed in m/min, the machine will move at this speed while processing the stone, reference speed for flat polish is
35~40m/min for the corners about 45~60m/min, max machine speed is 70m/min.
The slower you go the more the abrasive will grind, but you can also manage that with passes, more passes more grinding,
according to different tooling and materials you have to adjust speed and passes.
¶ manual change
To enable manual tool change for this tool, not necessary in normal conditions, it's recommended to click on the tool number
in program page or automatic page and change the color of it to yellow to enable manual tool change.
¶ Disable
Skip this tool in the program, it's recommended to click on the tool number in program page or automatic page and change
the color of it to red to disable the tool.
¶ Extend
Will enable this section of the program to be extended along the length of the piece in the automatic page, in normal
conditions it's kept disabled.
¶ Working block
When you create a new program section, the first empty working block is already created for you, you need to just compile
the values.
¶ Start angle
This is the angle at which the machine will orient itself at the beginning of the program, before engaging in
grinding the stone, avoid using 0 or 90, use 0.01 and 90.01 instead if you need to start from 0 or 90.
Working with polish down you always want your start angle more than 0 like 15-25-30, to avoid ruining the
polished surface.
The machine precise position it's also relative to the radius and center from table.
¶ Passes
This is the number of passes the machine will execute along the length of the piece at the above specified start angle.
¶ Additional working blocks

When you add a working block after the first one, you need to specify three values
¶ Increase to next position
This is the angular increment in degrees, which the machine will increase for each pass.
If the previous start was at 25 an increase to next position of 5 will dynamically rotate the motor 5 degrees each time it
travels from one side to the other of the stone
If increase to next position is set to 0 the tool will retract and move to the stop angle without being in contact with the stone.
¶ Stop angle
This is the angle of destination for this working block, the machine will either dynamically rotate till it reaches this angle, or
retract away from the stone and move to this angle depending on the value of increase to next position.
¶ Passes in stop position
This is the number of passes the machine will execute along the length of the piece at the above specified stop angle.
¶ Tips for programming
When you make programs, make them section by section tool by tool, and stop at each new tool, and run it, and see the
results, keep putting new stone till you reach desired result for that tool.
Then go to next, and run both, do changes, put new stone, prepare yourself with a lot of scraps to make the first few
programs; because the machine works with pads mostly by pressure, and position is somewhat relative, if you run once it will
for example grind 1mm if stone, if you run again it will grind another mm of stone totally 2mm, if you want 2 mm for your
program you will have to do twice the passes in the program and run them all at once.
Also each tool has it's own grit, so there are tools that grind a lot, those you run them faster if you want them to grind less,
and you do less passes, when they don't grind enough you add passes and slow down speed, even add pressure if necessary,
lower RPM can also have the tools grind more, but there is range where very low they won't grind at all, higher RPM can also
effect how much a tool grinds.
Always break your corners before making radiuses, run a few passes at 45 degrees with harder resin tools, before starting the
increments to make the round corners.
You make your shapes by setting up radius and center from table, and by creating a sequence of moves in the working blocks
to grind the stone to that shape.
The shapes will come out of the combination of these moves, it's good to break the angles in half with every next tool, and to
start before and end after in the angles for each next tool when you are doing radiuses, flats are just about placing the tool
center properly and go back and forth so many times.
It's important to realize that the tools are only pressed in position with by low and high pressure, which means that the
machine only guides the tool to the position where they need to grind, but it's up to the tools to grind the stone, therefore
tool grit, RPM and moving speed, all play an important role in making your shapes, more so that the position where you
placed the tool at, because if your tool is not grinding, no matter how many passes you program, it's just not gonna grind, if
you set the machine to do a 15mm chamfer, but your tool is not aggressive enough, you are not going to get a 15mm chamfer.
Only tool #1 it's allowed to be probed, and only tool #1 can grind enough to shape a bullnose or half bullnose, every other tool
after that needs to be taller, and will work by pressure and grit to grind.
Tool central hole size play an important role, tools with larger holes will grind the stone better on flats because of the reduced
surface area, tools with smaller central holes are better for corners because of the increased surface area, the patterns of the
tools are also important role, tools with patterns that run radially are not suitable for corners.
Use copy often, as most program sections are very similar.
Create your programs from the bottom up.
Maximum bullnose radius is 35mm.
Also in automatic you should probe the stone and the tool automatic, the Z height of the tool probed only really matters for
the diamond tool, and you can edit manually in the automatic interface